
The Dragon // Trench Crusade
This is a ‘mini’ I completed a couple of months ago, which I thought would be worth writing up while I work on a bunch of other bits and pieces. Created for Trench Crusade’s Dragon Hunt scenario, which has the warbands competing to take down a huge and horrifying monster (as well as the hapless peasants that have riled it so). From the scenario:
The Dragon is represented by a model on a base between 120mm and 300mm. Ideally, it should be large enough and shaped in such a way that two models on 60mm bases (or four models on 25mm bases) could stand on it at once. It can be a Larval Beast, a Possessed Tank, an actual Dragon, or any other large imposing monster.
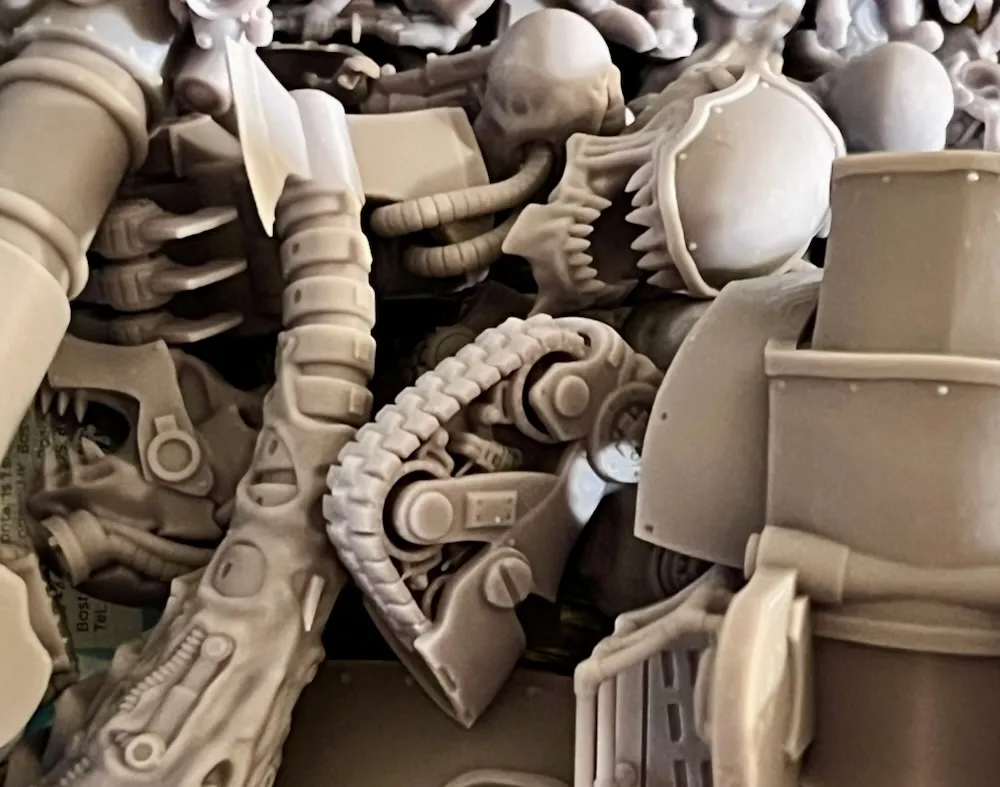
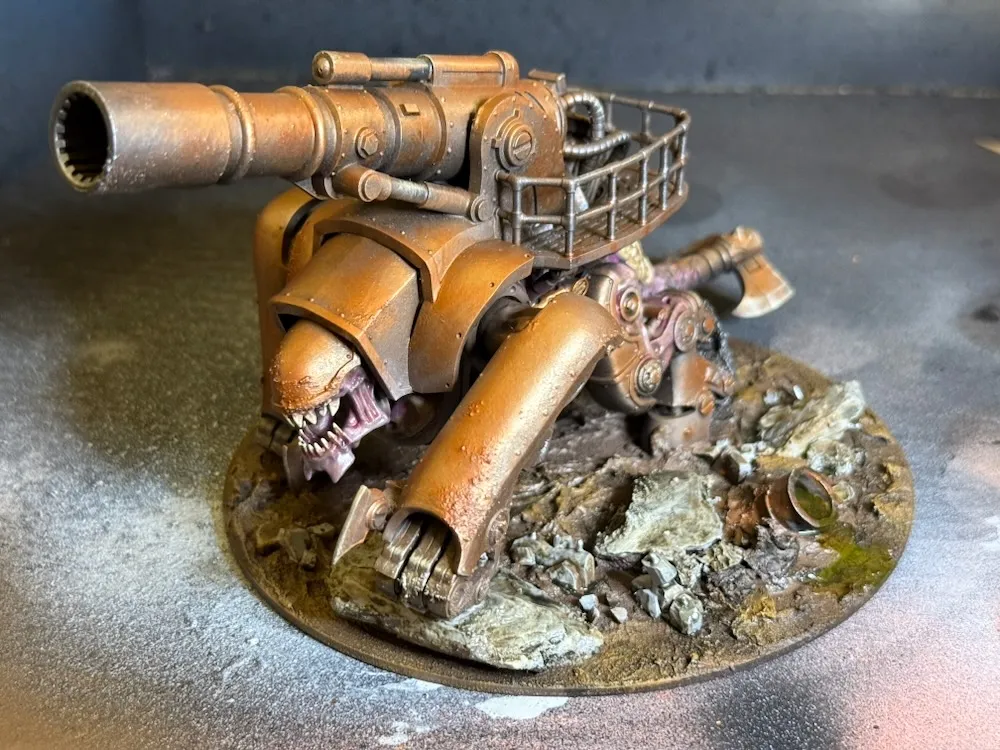
I had already printed the parts for this some time before, for a #fediPaint prompt that I didn’t end up having time to build, much less paint up. The model itself is the Xormentor / Artillery Drudger from The Makers Cult’s range of biomechanical horrors, roughly in the style of a certain species of Popular Space Aliens. It’s pretty much a straight build, with no real changes on my part – like most of their minis, it was an absolute pleasure to put together. I did make sure the front foot was raised enough to accomodate a semi-tactical rock undneath – not much point in a walking tank if it’s not making the most of those legs…
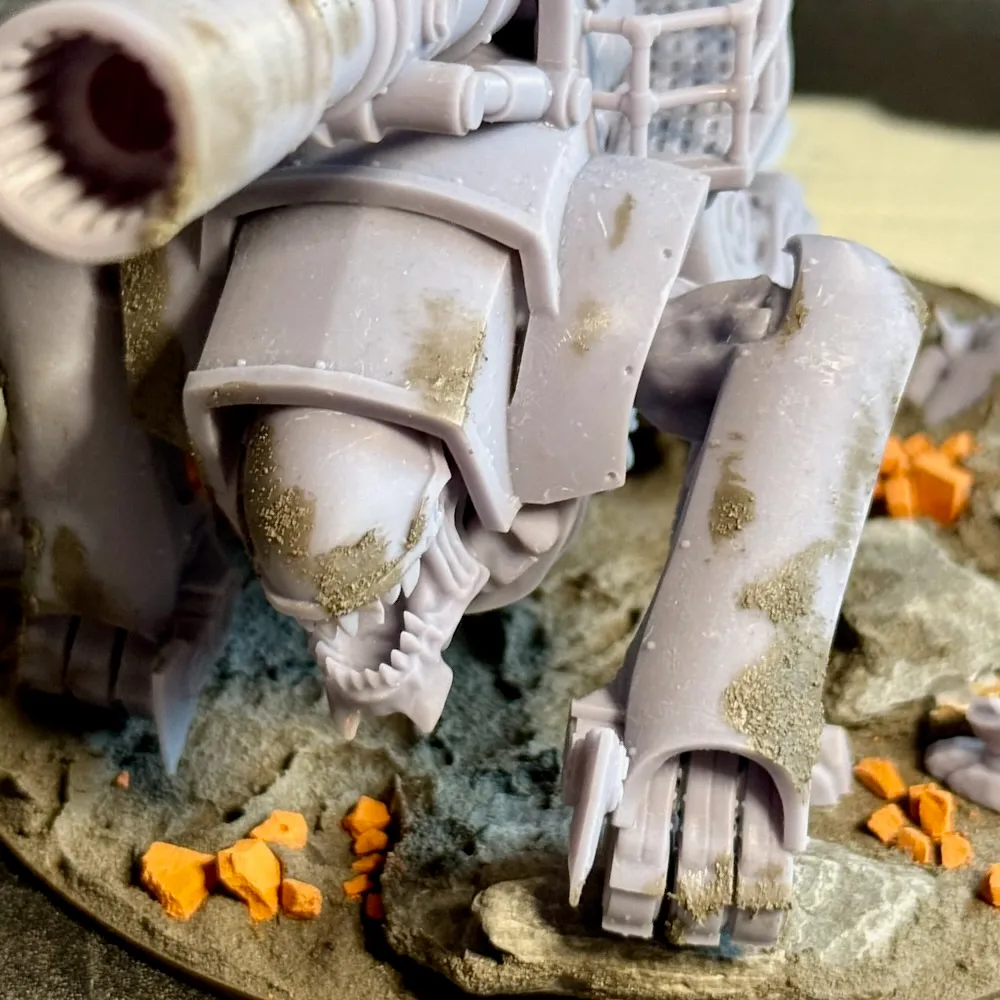
I based it on a large MDF round base of the kind I usually use for my Turnip lads – I ordered a whole drawerful (with a wide range of diameters) a while back, because it’s really frustrating to build something and then have to wait 3 days before you can base it. The big rocks are stones and slate picked from my local beach – I always love integrating bits and pieces I’ve picked up and taken home, it appeals to the art student in me. The mud (one of those Vallejo diorama pots) is built up around the rocks / feet / treads, and I crushed up some little clay bricks which got dotted around. There’s also pieces of printed debris wherever it felt like there wasn’t enough going on – these give little points of interest that can be painted up a little more carefully so the base doesn’t end up a big muddy void. I think these pieces of battlefield detritus (reinforced concrete, metal scrap, barrels etc.) are also by Makers Cult – I keep a big pot of these ready to go since they’re so helpful for terrain and basing. I also painted patches of the dirt texture onto armour plates around the model, since I wanted any corrosion and damage to have a 3 dimensional aspect.
Terraining Day
I’ll be honest, I usually find large minis a complete chore – I want to get to the fun bit (which for me is all the detailing and tweaks later in the process). This mini was unexpectedly pretty chill though, since in many ways it’s more like terrain than a character model.
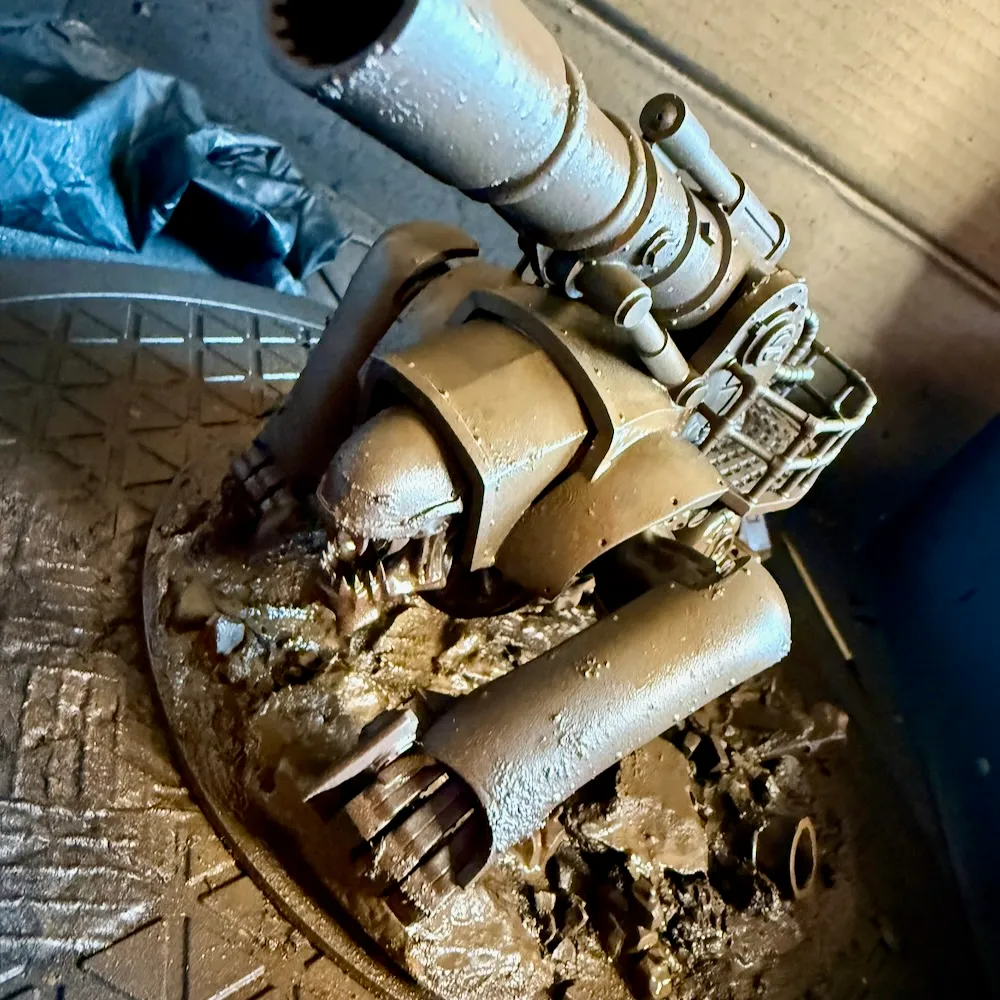
After priming it black, I airbrushed a pretty thorough base layer of rusty / muddy brown, only leaving the black in the extreme shadows, followed by a few passes of very vague zenithal highlighting with an increasingly white version of the base colour. I drybrushed the armour with Vallejo’s weirdly excellent Rust (Metallic), which is basically metallic red-brown, and gives a really wonderful base for armour that you want to look a bit sad and faded. I painted in the skin areas with a lurid pink-purple, and did the teeth a sort of teeth colour, cause y’know – teeth.
Ugly Phase achieved! From here I basically treated the mini like terrain – I built up metallics with semi-careful drybrushing, initially adding a dark bronze across the plates, then focussing darker gunmetal on areas which would move a lot or be exposed to heat (around joints, on the cannon barrel), for a charred / ground down appearance. I also went in pretty hard with a gunmetal drybrush on the areas that were metallic but not armour, like the crew deck on the back. For the skin, a drybrush of sickly grey over the pink-purple base tones, building it up to highlights where the light would be particularly strong. For the teeth, a yellowy teeth coloured wash – teeth.
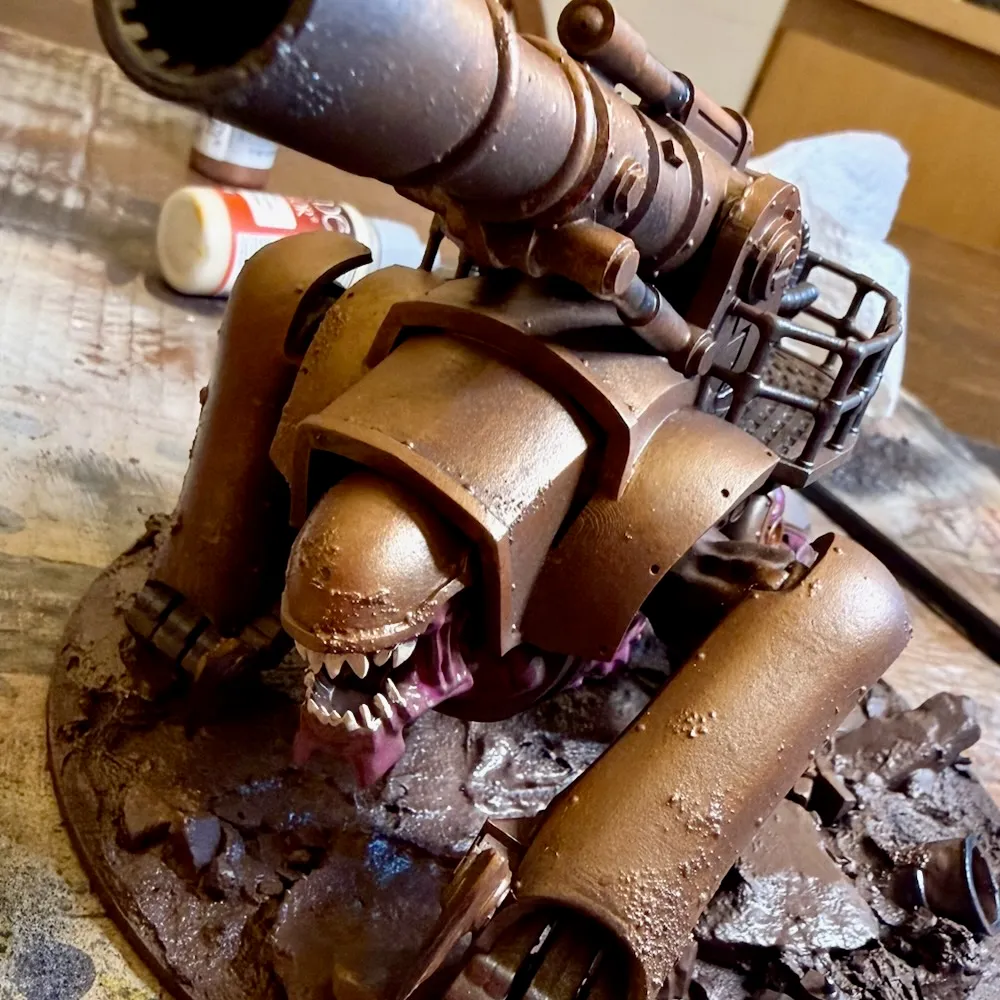
From here it’s pretty much drybrushing and washes – using a bright silver drybrush to carefully pick out highlights and hard edges on the metal, anywhere that would catch a lot of light or get scraped up (the axe-blade tail and the claws in particular). Weirdly for a big, #grimdark, armoured model, I didn’t fancy adding an oil wash, preferring to keep everything acrylic-based in this case.
I built up rust in stages – a lot of the time I like to use a thinned orange speedpaint for rust, or Dirty Down Rust if I really want to channel that tetanus vibe. For this I wanted it to be a bit more subtle, like the light sheen of rust that you get on well-used gardening equipment. I used a ready-mixed rust wash that I’d picked up from somewhere and built it up in patches, with several applications on the areas I’d textured earlier in the process. I also did the obligatory dark pin wash on all the panel lines (inside the gears etc.) – Vallejo Greasy Black Xpress paint diluted with water is my go-to for this, as it’s a black with lot of brown-green notes, especially when thinned.
Back to the base! I used a few different shades of water-thinned dirt / mud colours and blotched them over the mud to break up the colour. I had generally been painting up the metal parts (rebar, and the submerged barrel) with metallics as I did them on the dragon – not a fan of wasting paint when it’s already on the palette. I picked the rocks / concrete / bricks out in a mid-grey, highlighted with a drybrush, then gave everything a dirty black-brown wash (to accentuate details and also contrast the basing from the mini itself, which both started the same base shade).
The barrel in particular I spent some time on – adding Water Effect in the most mercenary way possible to achieve the ‘toxic waste’ spill, squirting it straight from the bottle until it overflowed and then tinting it with luminous green ink to get the sickly colour. In hindsight maybe I overthought / underthought this; it might have been easier to mix it up in advance and drop it in with a brush, but I do like the uneven effect.
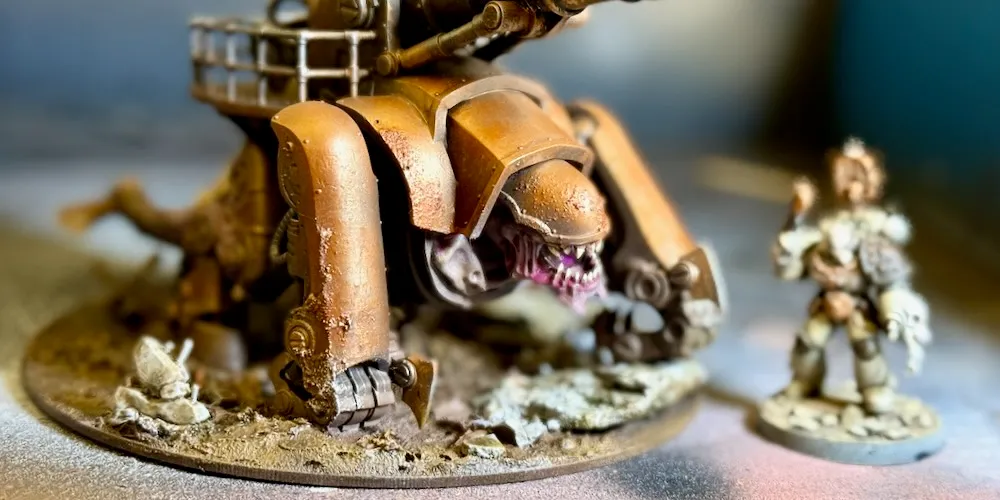
And that was pretty much it – like I say, terrain painting techniques (big drybrush, bunch of washes) applied to a mini. It’s a big mini too – shown with a Primaris Captain below for scale…
Peasant memories
Obviously after all that I didn’t get to play a Dragon Hunt for a while, but when an opportunity came up I realised we’d probably need some peasants for the scenario. I used some civilian models (again, thank you Makers Cult) and picked out the ones that felt conceivably period approprtiate – because this was short notice the night before a game, I didn’t get them properly painted, but did give them a base coat (I think with the purpley colour I was airbrushing my Lump model with at the time) and a brighter zenithal from there.
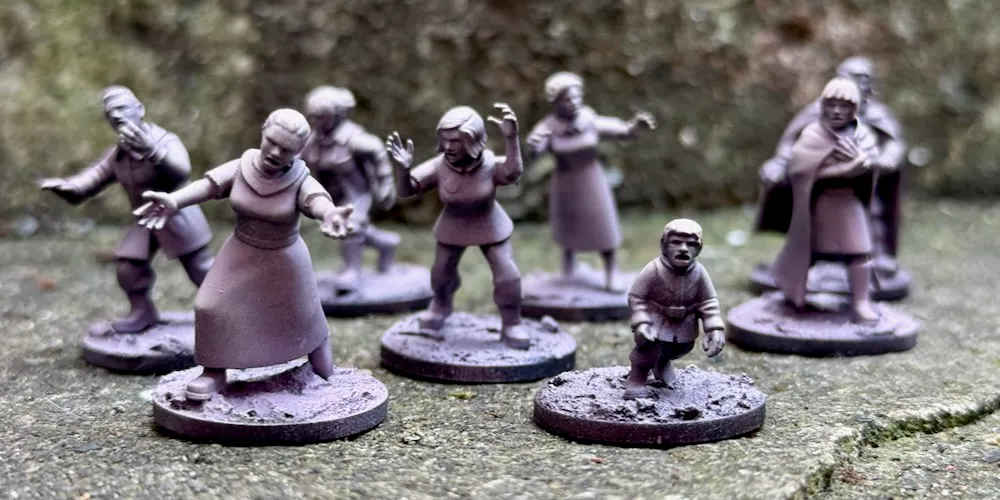
This actually worked well on the table – since these are somewhere between NPCs and scoring tokens, they were very recognisable. I’ll go back and paint them properly at some point! I will admit that I left the crying child out when we played the game – I made more peasants than were needed, and I couldn’t really bring myself to put him in the line of fire. I had no such pity for the others, although shout out to the old lady at the front, who survived being fired on by the Dragon’s main cannon as well as multiple assaults by both Heretic warbands over multiple rounds, eventually succumbing (but outlasting the Dragon). MVP of the game.